How to implement the coordinator pattern in a new project
In this post, I will outline how to implement the coordinator pattern in a new project. The post will include code snippets from this sample project that I created. Although the post is mostly focused on the actual implementation of the coordinators, I will also talk a bit about some of the considerations that I take when implementing a coordinator and the coordinator pattern. If you are unfamiliar with what the coordinator pattern is, I wrote an earlier post about it here. I also wrote this post, describing the coordinator components’ different responsibilities.
The sample project
The focus of the sample app for this post is to demonstrate the structure of a project that uses the coordinator pattern, it’s simply an app which displays a view, containing two buttons, these buttons lead to their own sub flows, with their own navigation logic. The image below outlines how the app’s different views relate to one another.
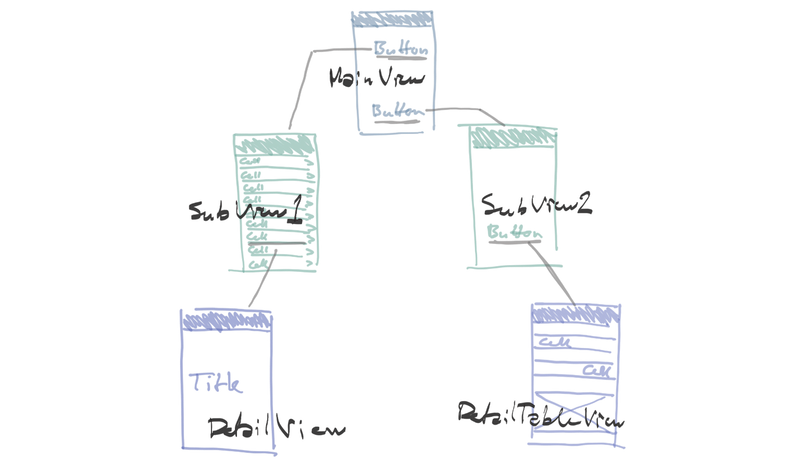
From an implementation point of view, the AppDelegate is initializing an AppCoordinator, which is responsible for creating a coordinator for the app’s MainView, this MainViewCoordinator initializes the main view and handles the navigation between the main view and the two sub flows, containing views of their own. Since each of the mainView’s sub flows have their own navigational logic, I also gave them their own coordinators, which are initialized from the MainViewCoordinator when the two buttons in the main view have been tapped. SubFlow1Coordinator handles the presentation of SubView1TableViewController and the navigation to SubView1TableViewController’s detailedView. SubFlow2Coordinator handles the presentation of SubView2ViewController and the navigation to SubView2ViewController’s detailTableViewController.
Now, let’s have a closer look at how to implement this coordinator structure.
The Coordinator protocol
As a start, I create a protocol which all of my app’s coordinators, parent as well as child coordinators, will conform to.
This protocol outlines the basic functionality for the app’s coordinators, including the basic variables that each coordinator should have, as well as the main functions that each of the coordinators should contain. These functions will either be implemented in an extension of the protocol or by the conforming child coordinators.
Coordinator protocol:
protocol Coordinator: class {
    var navigationController: UINavigationController { get }
    var childCoordinators: [Constants.CoordinatorKeys:Coordinator] { get set }

    func start()
    func addChild(coordinator: Coordinator, with key: Constants.CoordinatorKeys)
    func removeChild(coordinator: Coordinator)
}
Let’s go through what the above code does;
The navigationController is simply a UINavigationController, which will be used by each coordinator to present or push the view controllers that we want to display to the user.
The childCoordinators is a dictionary which will store a parent coordinator’s child coordinators. If the coordinator doesn’t initialize any child coordinators, this will simply be an empty dictionary.
The start function is a basic function that each coordinator is required to implement. This function - as mentioned in my earlier post, will be responsible for initializing either a coordinator’s child coordinator or the view that the coordinator is responsible for displaying.
addChild and removeChild, are functions responsible for adding and removing coordinators from the coordinator’s childCoordinators dictionary. Since the adding and removing of a child coordinator is a behavior which all coordinators will handle in the same way in this example project, I have added a default implementation of these functions in an extension of the coordinator protocol.
Coordinator extension:
extension Coordinator {
    func addChild(coordinator: Coordinator, with
                          key: Constants.CoordinatorKeys) {

        childCoordinators[key] = coordinator
    }

    func removeChild(coordinator: Coordinator) {
        childCoordinators = childCoordinators.filter {
          $0.value !== coordinator
        }
    }
}
The above implementation of addChild simply adds the coordinator parameter to the coordinator’s childCoordinators variable. The key parameter is used as the key when adding a value to the childCoordinators dictionary. Using a key here helps for potential later retrieval of the added child coordinator.
The removeChild function is filtering through the values of childCoordinators to update the childCoordinators variable to not include the passed in coordinator. This function is really important to prevent memory leaks, I will go through how to use this function in more detail later in this post.
AppCoordinator
The next step for the project is to utilize the coordinator protocol in the first - and the root - coordinator.
class AppCoordinator: Coordinator {
    private var window: UIWindow

    internal var childCoordinators: [Constants.CoordinatorKeys:Coordinator]
    internal var navigationController: UINavigationController

    public var rootViewController: UIViewController {
        return navigationController
    }

    init(in window: UIWindow) {
        self.childCoordinators = [:]
        self.navigationController = UINavigationController()
        self.window = window
        window.backgroundColor = .white
        self.window.rootViewController = rootViewController
    }

    public func start() {
        ...
    }
}
In the above code, the childCoordinators and navigationController variables are declared, as outlined in the coordinator protocol. However, the AppCoordinator is also responsible for the app’s window, this is the app’s main window which will be used to display the app’s different views.
Because of this, the AppCoordinator stores a UIWindow variable and a rootViewController of type UIViewController. The app coordinator is responsible for setting this UIWindow’s rootViewController, this is done in the class’ initializer. Apart from initializing the childCoordinators and the navigationController variables, the AppCoordinator’s init therefore takes a UIWindow parameter and sets the window’s rootViewController to the AppCoordinator’s rootViewController variable. This UIWindow parameter is provided by the AppDelegate when the app first launches.
Initializing the AppCoordinator from the AppDelegate
The app coordinator is different from other coordinators since it functions as a root coordinator and handles the initialization of the app’s first view, the app coordinator is created and started directly from the AppDelegate.
AppDelegate:
class AppDelegate: UIResponder, UIApplicationDelegate {

    var window: UIWindow?

    private lazy var appCoordinator: AppCoordinator = {
        return AppCoordinator(in: self.window!)
    }()

    func application(_ application: UIApplication, didFinishLaunchingWithOptions
                     launchOptions: [UIApplicationLaunchOptionsKey: Any]?)
                     -> Bool {

        window = UIWindow(frame: UIScreen.main.bounds)
        appCoordinator.start()

        return true
    }
}
In the above class, the lazy variable appCoordinator is created by passing in the AppDelegate’s UIWindow as a parameter when initialising a variable of type AppCoordinator.
Once the app finishes launching, the UIWindow is available, which allows it to be accessed by the lazily loaded appCoordinator property, which is used in calling the app coordinator’s start function.
The AppCoordinator’s start function
The app coordinator’s job is to initialize and present the app’s main view. Since the main view in the sample project will include its own sub flows and its own navigation logic, the app coordinator will initialize a child coordinator which, in its turn, is responsible for creating and presenting a view and for handling this view’s navigational logic. For this, the following code has been added to the AppCoordinator’s start function.
public func start() {
    let mainViewCoordinator = MainViewCoordinator(with: navigationController)
    addChild(coordinator: mainViewCoordinator, with: .mainViewCoordinator)
}
Here, the MainViewCoordinator is created by passing in the AppCoordinator’s local navigationController variable. Once this child coordinator is created, the coordinator’s addChild function will be called to add this child coordinator to the AppCoordinator’s childCoordinators dictionary.
Now let’s have a look at the MainViewCoordinator and the MainViewViewController.
The MainViewCoordinator
Basic structure of the app’s MainViewCoordinator:
class MainViewCoordinator: Coordinator {

    internal var navigationController: UINavigationController
    internal var childCoordinators: [Constants.CoordinatorKeys:Coordinator]

    init(with navigationController: UINavigationController) {
        ...
    }

    internal func start() {
        ...
    }
}
So far, MainViewCoordinator simply conforms to the Coordinator protocol, however, the MainViewCoordinator’s init is different from the AppCoordinator’s.
MainViewCoordinator’s initializer:
init(with navigationController: UINavigationController) {
    self.navigationController = navigationController
    self.childCoordinators = [:]

    start()
}
The above initializer takes a UINavigationController parameter, which is assigned to its local UINavigationController variable. After this, the childCoordinators variable is initialized by setting it to an empty dictionary. Once the class variables have been initialized, the MainViewCoordinator calls its start function. Before looking at what the MainViewCoordinator’s start function does, I would like to go through what the actual MainViewViewController does.
The MainViewViewController
MainViewViewController:
class MainViewViewController: UIViewController {
    @IBOutlet weak var button1: UIButton!
    @IBOutlet weak var button2: UIButton!

    let button1Tapped: (()->())
    let button2Tapped: (()->())

    @IBAction func button1Action(_ sender: UIButton) {
        button1Tapped()
    }

    @IBAction func button2Action(_ sender: UIButton) {
        button2Tapped()
    }

    init(nibName nibNameOrNil: String?, bundle nibBundleOrNil: Bundle?,
                button1Action: @escaping (()->()),
                button2Action: @escaping (()->())) {

        self.button1Tapped = button1Action
        self.button2Tapped = button2Action

        super.init(nibName: nibNameOrNil, bundle: nibBundleOrNil)
    }

    required init?(coder aDecoder: NSCoder) {
        fatalError("init(coder:) has not been implemented")
    }
}
The button1 and button2 IBOutlet are simply connected to the MainViewViewController’s corresponding UIView, which is laid out in the MainViewViewController.xib file.
Next, there is the button1Tapped and the button2Tapped variables of type (()->()).
Then there are two IBActions, button1Action and button2Action, which again are connected to the MainViewViewController.xib. These are the actions that will handle the taps of the two buttons. These outlets simply call the function stored in the button1Tapped and the button2Tapped variables.
The benefits of (and in some cases the reason for) using .xibs for the views, is that a UIViewController can be created by calling its initializer, which allows for use of dependency injection. When initializing the MainViewViewController, I simply pass in the dependencies for the MainViewViewController - the button1Action and button2Action, as well as the nibName and the bundle for the .xib file. In the init, I use the provided parameters to set the MainViewViewController’s class variables, followed by calling super.init(nibName: nibNameOrNil, bundle: nibBundleOrNil).
Now when the MainViewViewController is outlined, the MainViewCoordinator can create an instance of the view controller in its start function.
Start function:
internal func start() {
    let mainViewViewController = MainViewViewController(nibName:
                                 Constants.Nibs.mainViewViewController,
                                 bundle: Bundle.main, button1Action:
                                 navigateToSubFlow1, button2Action:
                                 navigateToSubFlow2)

    navigate(to: mainViewViewController, with: .push, animated: false)
}
What the above code does, is simply initializing a MainViewViewController. Once the mainViewViewController is created, it’s being push onto the coordinator’s navigationController by calling navigationController.pushViewController(viewController, animated: true) within the helper function navigate(to:with:animated:) (which is declared in an extension of the Coordinator protocol). This will make the main view visible to the user of the sample app.
Note that the above start function provides the MainViewViewController with parameter button1Action and butto2Action. The values provided here are two functions navigateToSubFlow1 and navigateToSubFlow2, these functions are class functions of MainViewCoordinator.
navigateToSubFlow1 and navigateToSubFlow2:
private func navigateToSubFlow1() {
    let coordinator = SubFlow1Coordinator(with: navigationController,
                                         using: .push,
                         removeCoordinatorWith: removeChild)

    addChild(coordinator: coordinator, with: .SubFlow1Coordinator)
}

private func navigateToSubFlow2() {
   let coordinator = SubFlow2Coordinator(with: navigationController,
                                        using: .push,
                        removeCoordinatorWith: removeChild)

   addChild(coordinator: coordinator, with: .SubFlow2Coordinator)
}
The above navigateToSubFlow1 and navigateToSubFlow2 functions create their own child coordinators and add these child coordinators to the mainViewCoordinator’s childCoordinators dictionary by calling the default implementation of the coordinator protocols’ addChild function.
You may have noticed that both the SubFlow1Coordinator initializer a the SubFlow2Coordinator initializer take a parameter called removeCoordinatorWith this is related to the removal of these child coordinators from the mainViewCoordinator’s childCoordinators dictionary, I will go through this in more details when describing the coordinators’ relation with the system “back” button later in this post.
Let’s have a closer look at the child coordinators that are being created in the above functions.
The SubFlowCoordinators
SubFlow1Coordinator:
class SubFlow1Coordinator: NSObject, Coordinator {
    internal var navigationController: UINavigationController
    internal var childCoordinators: [Constants.CoordinatorKeys:Coordinator]

    private var preferredNavigationStyle: navigationStyle
    private var removeCoordinatorWhenViewDismissed: ((Coordinator) -> ())

    init(with navigationController: UINavigationController, using
              preferredNavigationStyle: navigationStyle, removeCoordinatorWith
              removeCoordinatorWhenViewDismissed: @escaping
              ((Coordinator) -> ())) {

        self.navigationController = navigationController
        self.childCoordinators = [:]
        self.preferredNavigationStyle = preferredNavigationStyle

        self.removeCoordinatorWhenViewDismissed =
        removeCoordinatorWhenViewDismissed

        super.init()

        start()
    }

}
The implementation of SubFlow1Coordinator above is very similar to the MainViewCoordinator which I presented earlier.
This child coordinator simply conforms to the Coordinator protocol by declaring the navigationController and childCoordinators values, which are being set in the class’ init. The removeCoordinatorWhenViewDismissed variable is going to be used to remove the SubFlow1Coordinator from the MainViewCoordinator, which I will go through later on.
Like the MainViewCoordinator’s initializer, SubFlow1Coordinator calls start directly after initializing all of the coordinator’s variables, let’s go through what this start method looks like.
SubFlow1Coordinator’s start method:
internal func start() {
    let subView1TableViewController = SubView1TableViewController(nibName:
        Constants.Nibs.subView1TableViewController, bundle: Bundle.main,
        withAction: navigationWhenTapped)
    navigate(to: subView1TableViewController, with: preferredNavigationStyle)
}


private func navigationWhenTapped(cellWith title: String) {
    let detailViewController = DetailViewController(nibName:
        Constants.Nibs.detailViewController, bundle: Bundle.main, with: title)
    navigate(to: detailViewController, with: preferredNavigationStyle)
}
Again, similar to the MainViewCoordinator, the above start function creates a view controller, for which’s flow the coordinator will be responsible for. When creating an instance of the SubView1TableViewController, the action navigationWhenTapped is passed in as a parameter. What navigationWhenTapped does, is to create an additional view controller, an instance of DetailViewController, and then call the function navigate(to:with:) - which is simply a function responsible for presenting the newly created detailViewController to the user.
Let’s go through how navigationWhenTapped is being used by the SubView1TableViewController, during, and after, its initialization.
SubView1TableViewController’s behavior
SubView1TableViewController:
class SubView1TableViewController: UITableViewController {

    private let tableViewTapped: ((String)->())

    init(nibName nibNameOrNil: String?, bundle nibBundleOrNil: Bundle?,
        withAction tableViewTapped: @escaping ((String) -> ())) {

        self.tableViewTapped = tableViewTapped
        super.init(nibName: nibNameOrNil, bundle: nibBundleOrNil)
    }

    ...

    override func tableView(_ tableView: UITableView, didSelectRowAt
                              indexPath: IndexPath) {

        guard let cell = tableView.cellForRow(at: indexPath),
              let cellTitle = cell.textLabel?.text else { return }

        tableViewTapped(cellTitle)
    }
}
The above class’ init simply takes a parameter called tableViewTapped and then assigns it to the class’ tableViewTapped variable.
Further down, in the delegate function tableView(_:didSelectRowAt:), the class variable tableViewTapped is called, and is provided with the function variable cellTitle - which is the text in the selected row. Since the functionality of tableViewTapped is provided by the view controller’s coordinator - the SubFlow1Coordinator - in function navigationWhenTapped, it means that once a row is selected in SubView1TableViewController it simply hands over the decisions for the flow logic to its coordinator. The view controller’s coordinator (the SubFlow1Coordinator), in its turn, presents a new view with the selected row’s text as a title. There is one more thing that’s worth pointing out in the SubFlow1Coordinator. Let’s look at its navigationWhenTapped function again.
SubFlow1Coordinator’s navigationWhenTapped functionality - further explained
SubFlow1Coordinator:
private func navigationWhenTapped(cellWith title: String) {
    let detailViewController = DetailViewController(nibName:
        Constants.Nibs.detailViewController, bundle: Bundle.main, with: title)

    navigate(to: detailViewController, with: preferredNavigationStyle)
}
One main difference between the SubFlow1Coordinator and the MainViewCoordinator is that the SubFlow1Coordinator is only a child coordinator, and not a child/parent coordinator. This can be seen by the implementation of the navigationWhenTapped function above. This function is directly initializing an instance of DetailViewController, rather than initializing a child coordinator (which in its turn would be responsible for initializing the DetailViewController instance). This means that the SubFlow1Coordinator doesn’t add any child coordinators to its dictionary variable, and is therefore, not responsible for any child coordinators, and is therefore, not a parent coordinator.
Technically, the above function could initialize and add a child coordinator to its class’ childCoordinators dictionary, but in this scenario, an additional layer of coordinators is simply not necessary. That’s because the DetailViewController does not have any further navigational behavior, it’s simply just a view which is being presented to the user, where the only navigation comes from the system “Back” button, which is handled automatically by the system. In my opinion, it’s not necessary to add the complexity of creating another child coordinator from the SubFlow1Coordinator, so instead, the DetailViewController is initialized and presented directly from the SubFlow1Coordinator.
The back button
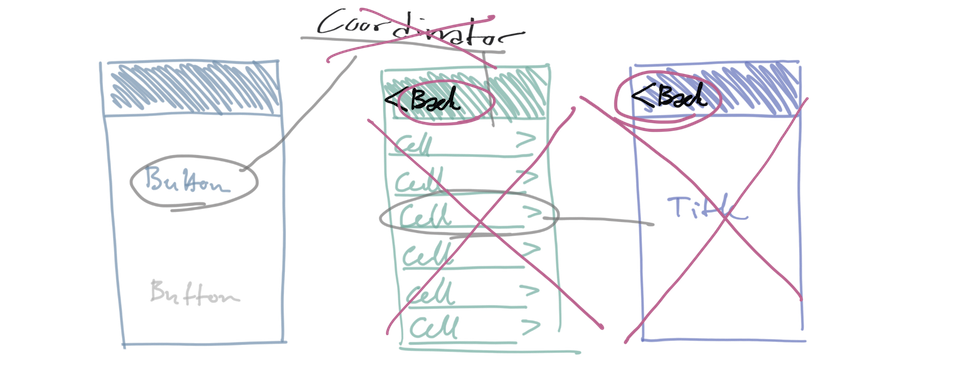
As mentioned above, the navigation functionality for a default “Back” button is something that the system provides to the view’s navigationController. When the user tapes the “Back” button, the presented View and its ViewController is removed from the navigation stack, as long as no references to these objects remain.
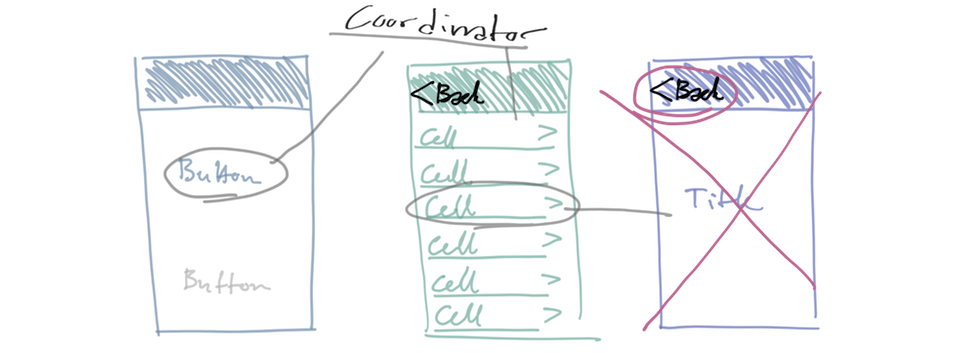
However, in the sample app for this project, and as seen in above diagram, the second view, the SubView1TableViewController instance, also has a “Back” button. This view, however, is initialized by the SubFlow1Coordinator instance, which sits in-between the main view and SubView1TableViewController instance and this coordiantor is not automatically going to remove be removed when the “Back” button is tapped. This means that the SubFlow1Coordinator has to be removed from the MainViewCoordinator once the “Back” button in SubView1TableViewController has been tapped in order to prevent this variable from causing memory leaks. This is where the Coordinator protocol’s removeChild function comes into place.
Note: I have based my handling of the back button tap on this great post by Soroush Khanlou. If you want to read more in detail about the “Back” button in relation to coordinators, I really recommend you reading his’ post.
As you may recall, when the SubFlow1Coordinator instance is initialized from the MainViewCoordinator, the removeChild function is passed in as a parameter.
navigateToSubFlow1:
private func navigateToSubFlow1() {
        let coordinator = SubFlow1Coordinator(with: navigationController,
                                             using: .push,
                             removeCoordinatorWith: removeChild)

        addChild(coordinator: coordinator, with: .SubFlow1Coordinator)
    }
Let’s have a look how the SubFlow1Coordinator’s init uses this parameter again.
SubFlow1Coordinator init:
init(with navigationController: UINavigationController, using
    preferredNavigationStyle: navigationStyle, removeCoordinatorWith
    removeCoordinatorWhenViewDismissed: @escaping ((Coordinator) -> ())) {

        ...

        self.removeCoordinatorWhenViewDismissed =
        removeCoordinatorWhenViewDismissed

        super.init()

        start()
}
In SubFlow1Coordinator’s init, the removeCoordinatorWhenViewDismissed parameter is set to the coordinator’s class variable removeCoordinatorWhenViewDismissed.
This means that when an instance of SubFlow1Coordinator should be de-initialized, the MainViewCoordinator’s removeChild function is available, which is the Coordinator protocol’s default implementation of the function, which - to recap - does the following:
func removeChild(coordinator: Coordinator) {
    childCoordinators = childCoordinators.filter { $0.value !== coordinator }
}
This means that now, when the SubFlow1Coordinator has access to the above function, the SubFlow1Coordinator can call this function once the back button of SubView1TableViewController is tapped. To do this, the sample app must recognize when the “Back” button for SubView1TableViewController* is tapped. One way to recognize this is by implementing the UINavigationControllerDelegate function navigationController(_:didShow:animated:), which can be done by making the SubFlow1Coordinator conform to this delegate.
SubFlow1Coordinator’s conformance to UINavigationControllerDelegate:
extension SubFlow1Coordinator: UINavigationControllerDelegate {

    func navigationController(_ navigationController: UINavigationController,
                              didShow viewController: UIViewController,
                              animated: Bool) {

        guard let viewController = navigationController.transitionCoordinator?.
                             viewController(forKey: .from),
                             !navigationController.viewControllers.
                             contains(viewController) else { return }

        if viewController is SubView1TableViewController {
            removeCoordinatorWhenViewDismissed(self)
        }
    }

}
In this implementation of navigationController(_:didShow:animated:), the guard let statement gets the ViewController that is being navigated away from, followed by checking that this viewController is no longer contained in the navigationController’s viewControllers variable.
Once this viewController is retrieved, the function checks if the viewController is of type SubView1TableViewController, if so, removeCoordinatorWhenViewDismissed will be called with self as a parameter.
Now, the last thing that needs to be done for the SubFlow1Coordinator to be removed from the MainViewCoordinator when the back button is tapped, is to add the following line of code to the init of SubFlow1Coordinator right before calling the start function.
navigationController.delegate = self
What this does, is to assign SubFlow1Coordinator as the delegate of its navigationController variable, which makes the custom implementation of navigationController(_:didShow:animated:) be called once the back button of the SubView1TableViewController instance that the SubFlow1Coordinator is presenting.
With this implementation, the SubFlow1Coordinator will be removed from the MainViewCoordinator’s dictionary of child coordinators once the SubView1TableViewController is dismissed.
SubFlow2Coordinator and SubView2ViewController
Throughout this article, I have been describing the SubFlow1Coordinator, its behavior and its initialization of the SubView1TableViewController in great detail. When looking through the sample project, you will notice that the implementation of the SubFlow2Coordinator class is very similar to the implementation of SubFlow1Coordinator. Therefore, I won’t go through the second sub-flow coordinator in detail in this post. I would, however, like to point out one difference, in SubFlow2Coordinator’s function navigationWhenTappedButton, a storyboard is initialized for the view that the app should present, instead of following the pattern of initializing a view controller through its init providing it with a xib and a bundle parameter. The reason why I implemented it this way, was to provide a sample implementation of how the coordinator pattern can be used together with storyboards.
Using coordinators with storyboards
So, let’s have a look at SubFlow2Coordinator’s implementation of the navigationWhenTappedButton function.
navigationWhenTappedButton:
private func navigationWhenTappedButton() {
    let storyboard = UIStoryboard(name: Constants.Storyboards.detailTableView,
                                bundle: nil)

    let detailTableViewController = storyboard.instantiateViewController
                                    (withIdentifier: Constants.Storyboards.
                                    StoryboardIdentifiers.detailTableView)
                                    as! DetailTableViewController

    navigate(to: detailTableViewController, with: preferredNavigationStyle)
}
This function starts out retrieving a UIStoryboard by its name - declared as a constant in the app’s Constants struct.
Once the storyboard variable is set, it’s used to instantiate a view controller, using a string (also declared in the Constants struct) as its identifier of type DetailTableViewController.
When detailTableViewController has been created, the view is presented using the helper function navigate(to:with:) which is declared and implemented in the Coordinator protocol.
Limitations using storyboards with coordinators
As you may have noticed, there are a few limitations with the above implementation.
First of all, the view controller gets force casted to a DetailTableViewController. If this class, later on, gets renamed or if the type of the view that is being retrieved from the storyboard is changed, it won’t be picked up by the compiler and will, therefore, cause a crash when the view is being initialized during runtime.
Second of all, since there is no init available when initializing the detailTableViewController through the storyboard, the implementation doesn’t allow for dependency injection on initialization. This means that any variables included in the detailTableViewController instance which the coordinator should set, will have to be either declared as public variables and then be set after the detailTableViewController has been created, or be set as part of a public function, which can be called at a later stage.
There are several downsides to setting these variables at a later stage. The fact that the variables for a view are required to be declared as public leaves the variable exposed and can be changed from any other class in the app. The variables are also required to be given a default value, or alternatively, be an optional value, which adds logic to the code with would otherwise not be necessary, alternatively, the variables can be implicitly unwrapped optional variables (Natasha The Robot writes about this approach using prepareForSegue here).
In addition, not using dependency injection at initialization of a class, means that any functions or callbacks handling the view’s navigational flow have to be set after the instance of the class has been created. This means that the view controller can’t use these functions to determine if a behavior should be available through the view that it controls or not. For example, in the sample project’s MainViewViewController the functionality of the view’s two buttons is being passed in through dependency injection and stored as local variables in the MainViewViewController instance. If the functionality of these variables are made optional, the view controller can decide whether the buttons should be displayed in the view depending on whether the variables button1Tapped and button2Tapped are nil or not. This means that it’s up to the MainViewCoordinator to decide if a functionality for the buttons should be provided, and depending on this decision, the view controller handles the logic of whether or not the buttons should be displayed.
Reflections
This has been a long post, I really wanted to capture how I implement a coordinator pattern in detail.
I intended to expressed in great detail how the coordinator pattern works by elaborating on some of my previous posts on the topic, I hope that this post was able to capture that. Hopefully, this can help you implement coordinators in your next project.
Using coordinators instead of storyboard segues can be a relatively large change, it requires some initial setup code and, to some extent, a change of mindset. I do however think that, once the coordinator protocol has been initialized and the first view is created from a MainViewCoordinator, the pattern is easy to follow and to keep on building the rest of the app’s flows upon. I think that adding coordinators to a code base really helps for the decoupling of the project’s flow, view controllers and views, which, in its turn, adds to the reusability of the code.
If you want to learn more about the coordinator pattern, make sure to download the sample project and to look through the links below for further reading.
Resources
Sample project:
coordinator-pattern-sample-project on GitHub